Thursday, January 23, 2014

Amazing Lasagna

Lasagna, its just one of those things isn't it.
 Its good. Not always great for you since most are full of cheese and meat and noodles, not much else.
This is even better.
Not only is it good for you. It tastes good.
Honestly, you don't even notice the sneaky healthy ingredients

Its a great great Brewer diet food too. We make this a lot to squeeze in a meal with Kale and squash.

There are three main parts
  • The squash sauce
  • Lentil Sausage
  • Kale


The Squash Sauces


Take a squash, I usually use butternut. Halve it take out the seeds, lay the cleaned squash cut side down on a lightly oiled pan at 350 until you can easy piece it with a fork. (30 ish min, totally depends on the type and size of squash though)
Let the squash cool a bit peel the skin off and dice the squash meat.

In a pan saute diced oinions and garlic
Add squash
a can of tomatoe sauce
any Italian spices you like in your tomato sauce (I added rosemary, basil, thyme, oregano, cumin)

Use immersion blender to puree the sauce
you can add diced tomatoes or more canned sauce to get a texture and consistency you like in tomato sauce

The Lentil Sausage

I took lentils and cooked them in our rice cooker untill they were tender.
I put them in the food processor to blend them 
Then I added 1 part ground pork to 3 parts purreed lentils and mixed them together.
Then I cooked the lentil meat mixture in a sauce pan till it resembled ground meat

Kale

I washed the kale and in the food processor cut it up into very small pieces.

To assemble I layered sauce, gluten free noodles, lentil sausage, kale more sauce, noodles, sausage, sauce and topped it off with cheese. Depending on how much you like kale I recommend doing just one layer with kale otherwise it can overpower the dish (unless your a kale fan)
We cooked the  whole thing in the oven at 350 until the noodles were tender
so yummy.

This is a great prep a lot and throw together meal, or to do what we did and make it in bulk and freeze a few for postpartum or days when you just don't have the energy to care about making healthy food.

Sunday, January 19, 2014

Blessingway

Last night was my Blessingway.
A Blessingway is celebration of motherhood and birth. Unlike a baby shower which is about giving gifts a Blessingway is about supporting the mom and giving her blessings and encuragment for her up coming birth. We did henna tattoos. All the guest brought beads and blessings or wishes for the birth. I got a few beads sent from family that are far away as well. I will be stringing all the beads onto a  necklace that I could wear during birth, I will probably hang it though, in a place I can see it near the birth pool. I will take all the wishes and blessings and hang them around the  birth pool to see them during labor.
Mostly it was a chance to see friends and have some much needed woman bonding before the baby gets here. It was so much fun. I feel so lucky to have such wonderful friends.


Beads

Beads so pretty, I can't wait to make my necklace with all theses pretty beads. I have all the blessings that I will frame and hang around the birth pool.

 Henna


 Henna.
I love henna, its a lot of fun to do. I did my belly in a mirror during nap time earlier this week and this is how it came out. It lasts for a about a week. C is calling it the baby heart. We still have a few tubes of henna left so I'm sure we will be doing hand henna again soon.


Henna hands 

Here are all the henna hands we did at the Blessing way. 


 Pregnant Bumps

Here are pictures of some pregnant baby bumps 

 Fun with Friends


 A few Pictures of most everyone having fun (We forgot to take pictures early and missed getting a few wonderful women pictures)


A great way to spend my birthday weekend and nice to see everyone before the baby gets here ( and everyone else has their babies) and hanging out gets to be a little trickier. 

Decorations 


Laureas was amazing and made the baby a blessing way banner like the one that C has. We will be adding the baby's hand prints to it each year and it will hang in the room where we are going to put the pool. Rob was sweet and hung a bunch of paper lanterns from our wedding from the ceiling in the living room to decorate for the party.

Cute Hats

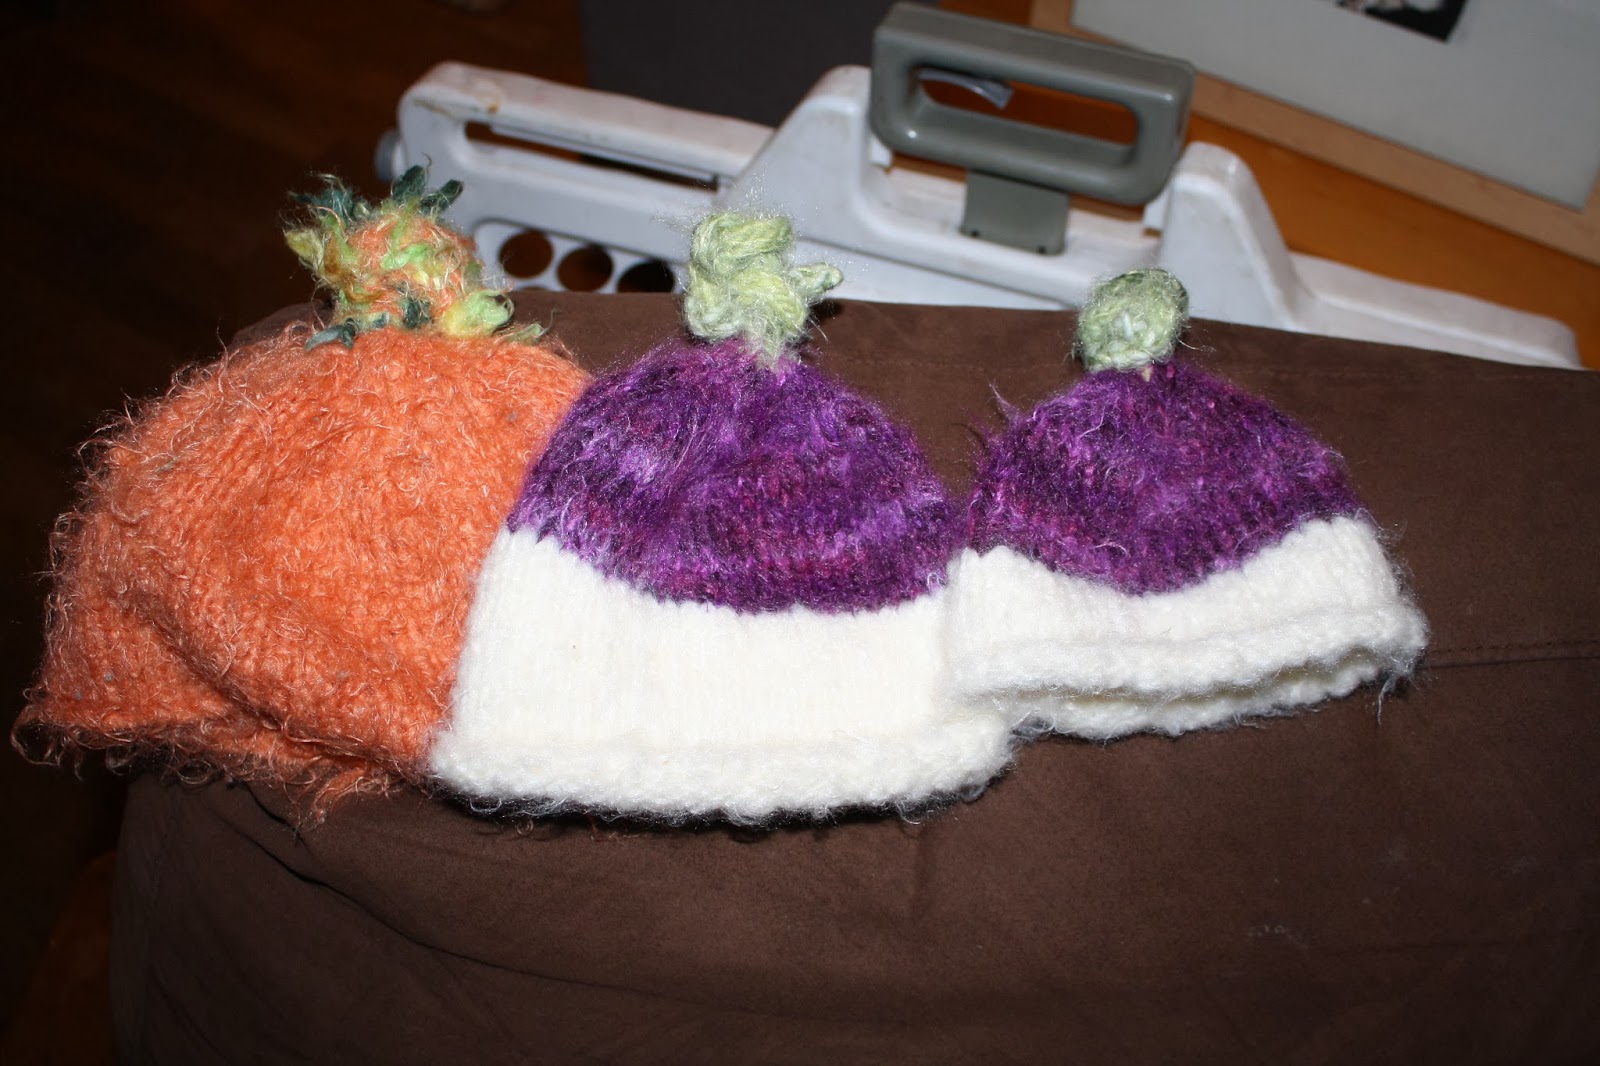
Ali from Knittybutton made me these little Rutabaga hats, we have nicknamed this baby rutabaga . C is our pumpkin baby and my mom made him his cute pumpkin hat. I wanted to do a sibling photo with each kid in their vegetable hat. Ali was nice enough to knit up these hat (she made a tiny one and a slightly bigger one just in case.) I can't wait to do the photo shoot with theses.


Friday, January 10, 2014

Stash Update

Here is my stash so far. I am hoping it will be much much larger very very soon (I have 4 more weeks!!) and I can get it done fast enough to make some newborn fitted diapers.

 On the top are 8 prefold inserts sewn up in a tri fold for the right after, who cares if they are bulking I'm not getting out of bed stage of postpardum. On top of them are two contoured pads that snap on to the waterproof layers. (blue and pink)


The green are panty liners the 1st tip toe into sewing cloth pads. I've come along long way from when I started sewing them. Here is what I have so far, no where near as many as I need but I'm definally getting the hang of it and figuing out what I like in terms of size and shape. Hopefully all the online help from facebook groups will mean that they will have the right sorts of absorbancy on the insides. 


The stars are an all in one pad that is another ultra uber insert. I plan on making some that are a little less bulky that snap on to the pink and blue shells.
The blue minky with sushi print is a heavy day pad (and I just sold it!) by far it is the best design combination yet. I plan on making a few more that are the same shape.


 The pink and green skulls are longer panty liners (I love that print)

The one below it is also blue minky its sort of a semi failed hybrid. I had to take the wings off the original and ended up sewing it on to an early attempt at a panty liner that was a little wonky. Result is a cute heavy/pp pad.


The hears are basically wingless panty liners I plan to cover in witch hazel and freeze to make ice packs for the large postpartum pads

sewing projects

I have been fairly diligent about sewing and have added a few new pads, a new fitted diaper, made a pillow case and pair of pants for Caden out of an old sweater, and realized that I have a month left till my due date and so so much left to do. I think regardless of when I started my projects I'd feel like I was running out of time at this point.  Today I hope to get a few more projects complete and started. I've also got the house to clean and baby supplies to get to get her for our home visit next week.
I'll post more pictures and descriptions of my projects later today.

Thursday, January 2, 2014

Mama Cloth- Sneak Peek

So I have a few posts about mama cloth planned, the hows and whys as well as a few tutorials. Here is a look at the start of my stash, that I started sewing up this past week. I've got plans to sew a whole lot more.


Holidays recap.

 Its been a nice little holiday break, the baby is growing and doing really well. We have had a few little issues with blood sugar and minor adjustments in diet have fixed them. (Nothing like adding the challenge of even more eating restrictions to our diet) Caden has been wanting to nap cuddled up to his baby. I've been letting him since the time he has to snuggle and dominate all of mommy's time is coming to an end soon. 
 He got a few new books and some new puzzles. He asked me to make him a Woo Woo Scarf  but couldn't decide which fabric he liked best so I quilted both of our firetruck fabrics together and made it red fleece on one side. He loved the snow when we had it and is getting quite good at going down the hill on his sled. 

Over all it was a good ending to the year.


Monday, December 23, 2013

Countdown

Its hard to believe that this week is Christmas and next week will be the end of 2013 and in about 7 ish weeks we will have a new little person living in our house. I'm not ready, like at all. We have spend the last week cooking and cooking and prepping food for February in the hopes that having lots of food ready or close to ready will make the transition easier.

  I also started pattering and cutting out my mama cloth stash and getting the supplies prepped for making fitted diapers, wet bags, and mesh produce bags. I would have had a lot sewn if my machine hadn't died and the machine I borrowed hadn't died three inches into sewing after I borrowed it.  I did however find machine on craigslist that looks like it will be a good back up machine and let me get theses projects done before the Rutabaga gets here. 

Hopefully I'll get my new machine and go on a sewing kick and get a bunch done and will post pictures when I do soon.

Wednesday, December 11, 2013

DIY Sunflower Butter

C is addicted to sunflower butter and at 6 dollars a pound we can't let him have it as often or give him as much as he would like. I stumbled across a diy make your own recipe and figured it had to be worth a try right?
I'm kicking myself we didn't try this sooner.  So easy less than 2 dollars and you control exsactly what goes in it. It didn't take any time at all either.

I roasted 3 cups of raw sunflower seeds in a pan. Apparently you want to roast them yourself so you don't lose the oils that are released in the roasting process and you get a nice nutty flavor.  Don't over roast them, watch them closely and stir constantly.
Transfer the seeds to the food processor (leave the vent open to let out the steam) and turn it on and let it go. Every once in a while stop the machine and scrape down the sides of the processor so it keeps chopping the seeds up. It takes a while but eventually you get something that is sort of butter like. I think it was around 20 minutes or so till we hit that stage. We added a pinch of sea salt and then add a little extra virgin olive oil to make it creamy start with a little let it run till you reach a consistency you like, same goes with sweeter (honey, maple syrup both work well) start with a little until its the right amount sweet.
Here is a guess for the add ins but its just a rough guide.
  • 2-4 tablespoons light tasting oil (I prefer coconut oil or light olive oil)
  • ¼ teaspoon honey (optional)
  • ½ teaspoon salt (to taste, or omit entirely…depends on your taste buds)

That's it your done. So Easy.  store in a jar in the fridge.

Sewing Projects

This pretty fabric is for wet bags and produce bags.
I've finished up the winter markets, we did really well. We are reworking out website to make the online shop work better and look nicer it will be great once we get it done. For the most part I can take a break from Roxy Roodle to work on all the baby projects I have that need to get done in the next 8 weeks.

I'm hoping to make a good start of mama cloth, produce bags, and wet bags today.  I have the wool prepped for making infant diaper covers. Menu planning for my postpartum freezer fill is under way.

Tutorials on the sewing project and other projects are in the works.Please leave a comment below if you are really interested in seeing one of the projects more than the others and I'll try to get that one written up first.  I'll post our organization and prep for hopefully making the transition to a two child house easier and then update them at some point with how well our plans worked after the baby has been here a while.

I'm totally excited to get C down for a nap and start cutting out fabric and figuring out just what prints I want to use for what and to write out a master sewing/ project list to try and keep myself on task.

Wednesday, December 4, 2013

lots of little changes... Big impact.

I've been thinking a lot about how to make our eating habits better. We eat better than most people but we are far far from where I would like us to be. I'm going to attempt to start making lots of little changes and hopefully by this time next year our eating habits and food budget will be looking much much better.

A lovely friend of mine stumbled across this cool website were a mom is attempting to actually feed her family of 4 real foods, organic, all that good stuff for 400 dollars a month. Lots of blogs have written about doing a "Food stamp challenge" but the majority missed the point and had lovely stuffed stocks of healthy food they "shopped for free" also rules about how they got a certain number of meals that didn't count each month, totally cheating and not really helpful. This mom made her rules much stricter and as close to real life working family who might be on food stamps like as she could. You can check it out here 

Anyway, I'm hoping to pick up a few tips on how to add more organic goodness into our diet and eat better without breaking the bank. I'm hoping to get a little better at going after manufacture coupons for natural stuff we actually use and figuring out how to combined them if possible with store sales to save a little

The 1st little change I want to is give up canned beans and make the switch to only using dried beans preferably local when we can get them and by 2015 100% organic.  We use a lot of beans mostly black, pinto, and garbanzo. We also do a lot of lentils and I want to work on making sure we are getting those as organic and local as we possibly can as well (shouldn't be to hard I wouldn't think we do live in the lentil capital of the world.) 

My hope is that, while we might not save money switching from convectional canned beans to organic bulk that they will at least come out the same cost wise, health wise the switch is a huge improvement, since it would basically cut out 60% of our canned foods usage (tomatoes and coconut milk are all that's left)

The second little change is switching from using oil in baking to only using cold-pressed coconut oil (occasionally I'm still not a big fan of it in baking) or using organic applesauce.  I'll still use real EVOO in cooking and things but my hope is to seriously minimize the amount of oil we consume.  

Tuesday, December 3, 2013

Coconut oil whipped lotion

Today I had a good amount of coconut oil that needed to be turned into lotion. Coconut oil is amazing stuff but if its cold it turns into a hard block of oil that can be tricky to spread all over you skin. I'd read online that you could put it in the kitchen aid mixer and whip it and that would keep it from being a block and it would stay in a nice fluffy whipped consistency.

 Turns out it does, we added a little honey to part of the whipped oil and it was a little difficult to convince a certain two year old to stop eating it. It made a really nice lotion.
 I added some melted bees wax to another batch and made a lip balm, hand cream for Rob his hands get so chapped in the winter they bleed its no fun. I'm hoping that it will help keep his skin hydrated and from cracking.

 C boy has had some dry skin and peeling skin so I added a little Epsom salt to a little oil to make a body scrub (I would have used sugar but we seem to be out.) and we scrubbed down his elbows, knees, and baby bum to get rid of the dry skin and then slathered him in lotion after his bath. He smells like a soft little coconut. He helped put lotion on my growing baby bump too which was pretty cute.

 I put most of our new lotions into small glass mason jars, the lip balm got separated into little batches and put in plastic baby food freezer containers that just hold a few ounces and the lotion for the shower ended up in a travel silicon reusable container since glass and showers don't mix. 

This was such an easy, fast, and cheap way to make a bunch of safe body products. I would write up a tutorial but there really isn't anything to write, it was that easy. I didn't measure anything or need to add anything to the oil, all the extras I added in where done on a whim. You can add essential oils to make scented oil too but I didn't have any that I wanted to smell like so I chose to leave them unscented.

Monday, November 25, 2013

Over the river and through the woods

We are getting ready to head out to grandma's house for the start of the holidays. Its hard to believe that its the end of November already. I'm 29 weeks pregnant and this fall has been a busy. I started writing for a website called crunchymoms.com Go check out all the cool articles on natural parenting and crunchy mommy hood. It has been exciting and taking a bit of time to get in the swing of yet another set of deadlines, I'm enjoying the challenge and it has given me so many ideas for posts I want to write here. C is growing an amazing rate and turned into a smart caring little boy, he is defiantly not a baby anymore. I'm still sewing my nights away working on Roxy Roodle projects. I'm hoping to get organized enough to finally get a few bulk buys run this spring and summer and defiantly do a lot more next winter. We have, as always lots of big house projects planned both before the baby gets here in 10 weeks ( omg that is soon!) and this summer.

That's what is new and happening in our household at the start of crazy holidays this year. Hopefully everyone traveling will be safe and have fun. Eat lots and lots of pumpkin pie and latkes and try not to stress out to much about the ever growing to do list.

Thursday, November 21, 2013

Elderberry Syrup


I've been hearing a lot about elderberry syrup and how a spoonful of the stuff taken everyday drastically reduces your probability of getting a cold. With a two year-old in the house (we all know what germ magnets they are) and being pregnant this winter I don't want to get sick, my husband can't afford to get sick (hes saving up his sick time for when the baby is here) Anything that might help us avoid getting sick sounds like a good idea. The stuff is supposed to taste good too, and it can't hurt to try it. Which is my philosophy on most things crunchy. The only thing standing in our way was the cost of a bottle of this magic stuff at 20 dollars for a 16 oz bottle there was no way we where buying it. Which left good old make it yourself.  Finally I got around to ordering a pound of organic elderberries off Amazon which was around 20 dollars including the shipping. The recipes online looked pretty strait forward with the same basic ratio of water to berries and honey the herbs and spices differed depending on who wrote the recipe. So I didn't follow them exactly

Boil 3/4 cup of berries in 3 1/2 cups of distilled water along with whatever herbs or spices you wanted to add in to boost the germ fighting goodness. I threw an organic echinacea tea bag, some ground fresh ginger (about 3 teaspoons), and some cinnamon (a tablespoon maybe) Let the brew simmer for 45 minutes to an hour till it as reduced by about half the amount of liquid. Then strain the mixture into a glass bowl through a fine mesh sieve mash the berries to get all the juice out and then discard them. The brilliant purple juice should be about 16 oz worth give our take.  Let it cool a bit then add in a 1/2 to a full cup of local raw honey. I added a half cup after hearing from a friend that a full cup (what most recipes call for) was way way to sweet. stir the honey around let it devolve and pour the syrup into a jar. You can take up to a tablespoon a day to keep sickness away, or a few tablespoons if your sick. Kids under a year or two should not take this since it has raw honey but if you have older kids they can take a 1/2 to a full tablespoon.    C thought it was really yummy and asked for more medicine after licking every last drop off his spoon so I don't foresee and issue getting him to take it everyday. I have to agree with him it was pretty yummy. Hopefully it works and we won't get as many runny noses and colds this season. I'll let you know how it seems to be working as the winter progresses.

Bucket list :Cheese making

I'm not sure why I was so intimidated by making cheese, with so many pictures of how easy it is on Pinterest and all the oh so simple guides in all the homestead books I read. I was though. The whole concept of heating up milk adding a few things to it and in and in a few hours having pretty amazing cheese is kind of cool.  With the help of a friend we tackled cheese making today. The tutorial we used was the one on The Family Homestead blog. It didn't require a microwave like so many tutorials out there and it had the added bonus of how to use the whey to make ricotta.  Since everything is already dirty and the tons of whey (it was over 2 gallons) isn't so useful was a nice way to expand the cheese making experience and not feel so bad for wasting all the whey.

Taking the milk temperature basically you add the milk to the pot a little citric acid and let it heat up to 88 degrees
 then you add rennet that has been diluted in water and let it keep heating up till it gets to 105 degrees. Stirling the pot occasionally.Then you cover it let it sit for 15 min and the hard part is done. It was ridiculously easy. Hardest part was trying to figure out how to get the thermometer to stay suspended in the giant pot (not the sewing thread and clothes pin) and keeping 2 two year-olds out of the kitchen. 

 It gets all clumpy and becomes curds and whey. (feel free to insert Miss Muffet jokes here) 


 Then you drain off the whey. We put a colander over attached a cheese cloth. Well a flat cloth diaper, the gauzy cheese cloth stuff doesn't work don't use it but the cheap flat diapers work great.

 This is half the whey we had left over its going to make a few dogs and chickens very happy, I hope. Apparently they really like it on their food. You can all so use it in baking as the liquid in bread or in soups. We try to minimize the amount of dairy that C come in contact with though so I didn't save any food cooking 


After you drain off the whey (before you dump or store it) you take the still suspended cheese and pop it in the fridge for a few hours and put the whey back into the pot add some more milk and heat it back up to 105 degrees. Let it sit for 15 min and then drain the whey out and you get ricotta.  It looked solid until I added more fresh milk and broke it up a bit then it looked much more like the stuff you buy in the store. Thousand times more yummy. C was dancing around the kitchen singing "yummy cheese I eat it more."


Finishing the mozzarella cheese was a little more complicated. You take it out of the fridge and run hot water over it to get all of the whey out. It falls apart into a curd mess that is terrifying if you aren't expecting it. I drained mine through the cheese cloth and kept running the water over until it was clear. Then you stretch the cheese ball and the clumpy cheese gets magically stringy and looks just like mozzarella should.  

I will defiantly be doing this again. Often. We love eating lasagna and you cannot beat a mozzarella basil covered tomato that has been roasted on the grill in the summer. With cheese being so expensive however (not to mention filled with extra preservatives and hidden soy and gluten, yuck)  We don't get to have lasagna goodness all that often.  I have a feeling that might change.

Tuesday, November 19, 2013

Homestead Bucket List

I spend lot of time nursing C and scrolling through Pinterest looking at pins of crunchy mommy, crafty DIY, house and garden dream lists, and lots of homestead ideas.   I realize that this lifestyle of earthy mom, attachment parenting, make it yourself and make do without. Simple natural life thing is oh so trendy right now. Lucky me it means lots of information on how to do all sorts of "old fashion" skills with pretty pictures. I'm a sucker for good photos. 

I am not a new passenger on the Crunchy Homestead train. I grew up in it, well before it was cool. We walked the walked and grew the garden and lived a simple life.  Now that I'm raising my son as a 2nd generation crunchy homestead kid, I want to try all sorts of aspects of the lifestyle.  There are aspects that worked for my parents that wont work for me and like wise things they chose not to do that we may end up incorporating into our life.  A big part of growing up this way is that you constantly evaluate if things are working or if they need to be changed, Comparing the reality of life with an idealized picture of how it could be (with an endless supply of time, money, and people to run it.)

Which brings me to my bucket list. I am a big list maker, I like to plan and thing things out and often don't ever actually get around to doing them. The point of the list is to save all the "oh one day I'll try that" things and to actually cross things off. Evaluate if they worked and are worth doing again and hopefully it will provide the motivation to Try things vs just think about it. My Goal is to do a minimum of two things (or one really huge one) each month. Eventually after a few months I may increase the number or type of projects for the Bucket list project breaking the list down into sections and doing one thing from each section. I want to start of small and work up to doing more however since its the start of the holidays and I'm 7 months pregnant things are a little busy around here.

My plan for this month (November)

Elderberry syrup:  Apparently taking a spoonful of Elderberry syrup every day helps keep you from getting sick and when you do get sick upping the dose makes you get better faster. Sounds cool and worth trying out. A 16 oz bottle of the stuff costs 20 dollars at the Co-op. I decided that if we were going to try this it would be good old DIY way. I ordered a pound of organic elderberries off Amazon and found instructions on how to make the syrup. As soon as the berries get here (should be today!) C and I will try making some. If it works, I have plans for planting two bushes in the back this year so we can harvest them ourselves and sell the extra.

Mold-able bees wax for sculpting:  This  looks way easy to make, other than messing around with melting bees wax. I have hopes it will be a great gluten free substitute to play dough and C will enjoy creating with it.


The whole Bucket list will be posted somewhere on the blog as soon as I get around to writing it all out. Its a long long list that I see getting longer all the time as I find new projects and discover new interests in my crunchy mama homesteader adventures.  Things that will definatly be tacked in the next few weeks/months are
Sewing Fitted Cloth Diapers
Sewing Mama Cloth
Sewing Baby Wipes
Making Herbal Sitz Bath

I'm having a Blessing way and Preparing for this baby and a homebirth (February is getting closer I'm 28 weeks already!)  Which means I'm sure lots of cooking, recipe trying and other little diy projects for the new little one.  I'll be posting about it all (I promise!)


Monday, September 9, 2013

Food

Its a little hard to chase around a toddler and make healthy Brewer diet food for every meal. There are little ways to cheat and make it easier.

Today for breakfast we had Swiss Chard, Kale, caramelized onion, mushroom, roasted pumpkin seed, ginger pork sausage, roasted red bell pepper with acorn squash scrambled eggs. It took less time to make than our two morning lattes

I found that by cooking a bunch of leafy greens up with onions and mushrooms and storing it in a container in the fridge that its easy to throw a portion or throw into everything. I also love making big batches of things like caramelized onions they take all day in the slow cooker but a whole slow cooker worth frozen cubes easy to pull out of the fridge and slice off a portion and throw it into meals. Same with the red bell peppers we grilled 10 or so on the grill when they were in season and cheap froze then and its so easy to slice a portion. Not to sound like a broken record I roast a few different types of winter squash and stick them in the fridge or freeze them into cubes

Its great to go to the store on the weekend buy a lot of produce and prep it all for the week and if something is on sale and in season get a lot and freeze it.  Lots of days I'm tiered, busy the small folk in my house are crazy I can throw a frozen chicken breast brown rice a few cubes of frozen veggies or squash, add a few herbs form and its easy and healthy and grabbing a few frozen cubes or adding a few spoonfuls of leafy greens from the fridge after its done cooling is so easy.

It makes following this diet so much easier.


Monday, June 3, 2013

Brewer pregnancy diet with food allergies

I have been searching the web for information on pregnant woman who followed the Brewer diet with gluten free modifications. I just can't seem to find any good blogs were they talk about how they did it.  So I decided to say screw it a d write the blog posts I wanted to read.  The Brewer diet, for those who don't know is a high protein, lots of nutritional goodness diet for pregnancy that if followed is supposed to prevent preeclampsia and help with healthier overall babies and pregnancies.  You can read more a out it here.

The thing is its a Ton of food and even when you have no issues and can eat everything on the lists it's still a lot. I have the added challenge of trying to get it all with no gluten, no nuts, no dairy, no citrus, and limited eggs.

I've decided to keep track of what I'm eating, post some of the better recipes and try to do regular posts on what I'm doing to follow the diet.  Hopefully it will serve as motivation to keep it up and maybe help other celiac pregnant women and women with diet restrictions see how some else made it work.

Sunday, June 2, 2013

update on what's new

We've been busy working on the yard. Caden got a fancy new art space and one other thing
Caden's got some BIG Boy News!!
HE'S GOING TO BE A BIG BROTHER


Monday, May 20, 2013

Gluten Free Corn Bread Bites

C is a little obsessed with bread, part of it is that its a rare treat to get anything bread like, since he is gluten free and the gluten free breads that you can buy are expensive and don't taste good, we don't do bread very often. Today we made corn bread in mini muffin tins which is the perfect size for little hands.  I didn't exactly follow a recipe, shocker.  I substituted gluten free flour for the whole wheat and used water instead of milk, the recipe called for butter but I used coconut oil and EVOO in its place. I added sunflower seeds, flax seed, flax meal and used molasses in place of sugar. They came out great yummy slightly nutty. Happy baby, happy mommy. I will post the actual recipe tomorrow and pictures of the little guy cooking tomorrow when we make another batch.

In other highlights today was the third stroller exercise class today, its hard and one of the babies actually pointed at us and laughed while we were doing a particularly hard set of exercises  Its a fun class however and I'm hoping that after a month of going three times a week, I will be a little closer to summer swimsuit weather.
  C and I also learned that apple cider vinegar makes amazing conditioner, you only smell like a fish and chips shop for a few minutes and then the smell goes away but it leaves your hair bouncy and tangle free. You should not let it get in your babies eyes it makes them scream and scream and will feel like a horrible mother. He got over it and is happily sleeping next to his puppy now.
All in all it a fulfilling day.


Related Posts Plugin for WordPress, Blogger...